|
Here's another bunch of useful Windows 95 "tweaks". Make Windows behave the way YOU want it to!
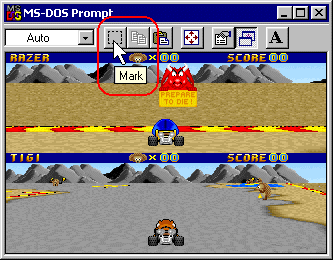
Visual Display of Directory from Command Prompt Visual Display of Directory from Command PromptIf you are at a command prompt and want a visual (GUI) display of a directory (folder), type "start .", or "start .." and an open folder of that directory appears on the desktop. Drag and Drop Filenames to the Command PromptYou can drag file and folder icons from the desktop or a folder to an MS-DOS command prompt. The filename is then in the keyboard buffer of the running MS-DOS-based application. Copy & Paste Information To/From a Command PromptActivate the toolbar in the MS-DOS-based program window to gain point-and-click access to copy and paste operations from a Windows-based program to an MS-DOS-based program (or vice versa). For example, copy a folder output on the screen, and then paste it into mail. To turn the toolbar on, right click the title bar and select Toolbar from the drop-down menu. To use it, click on the Mark icon, then drag a rectangle around your selection. Click the Copy icon to copy the information to the Clipboard. Alternately, you can right-click the toolbar and select tools from Edit on the drop-down menu. Copy Graphics from DOS tooIn the last tip we told you how to Copy & Paste Information To/From a Command Prompt. Did you know this also work for graphic images inside a DOS window as well? You can copy graphics from a DOS box as easily as you can text. For instance, while running a DOS game, you can:
Alternately, if you already have the toolbar turned on, simply select the Mark icon, then outline what you want to copy. Click the Copy icon next.
Editing MS-DOS Prompt PropertiesIf you set the properties for an MS-DOS prompt the wrong way, and you can't open an MS-DOS window, go into the PIF directory and edit Command.pif, or find Command.com and edit the properties there. Using DOSKEYIf you want to use DOSKEY in an MS-DOS window without loading it in Autoexec.bat or creating a startup batch script, you can go to the Program properties and enter doskey as the startup batch file. If you decide later that you want to have a real startup batch file, simply move DOSKEY into this batch file. Directory Shortcuts from a DOS PromptRelated directories have the following shortcuts:
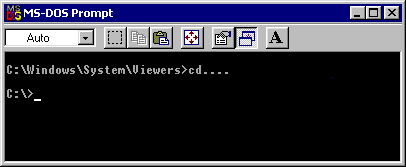
. . = parent directory . . . = parent directory once removed (new in Windows 95) . . . . = parent directory twice removed (new in Windows 95) For example, if you are in the C:\Windows\System\Viewers directory, and you enter cd . . . . at the command prompt, the directory changes to C:\.
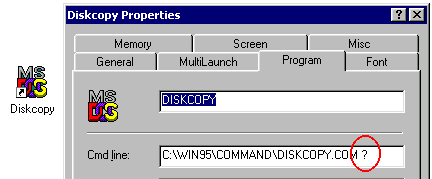
Adding Command Line ParametersAdd a "?" to the command line of MS-DOS programs, and you will be prompted to add parameters when you start the program. This is especially useful with MS-DOS program shortcuts.
Using System MonitorSystem Monitor is one of Windows 95's included utilities, but ONLY if you have the CD-ROM version of Windows 95. If it was installed you can find it in the Accessories/System Tools folder. It monitors system resources, threads, processor usage, network and disk access, etc. If you don't have it installed, here's how:
If you don't have the CD-ROM version, Click Here to see more information about it and the other "CD Extras" or Click Here to go get it right now. Using NetWatcherNetWatcher is one of Windows 95's included utilities, but ONLY if you have the CD-ROM version of Windows 95. If it was installed you can find it in the Accessories/System Tools folder. You can see who is currently using resources on your computer by using NetWatcher. You can also add shared folders and disconnect people from your computer or from specific files.
If you don't have the CD-ROM version, Click Here to see more information about it and the other " s" or Click Here to go get it right now. Microsoft Emergency Recovery UtilityThe Microsoft Windows 95 Emergency Recovery Utility is designed to provide a backup of your system configuration in case a problem should occur.
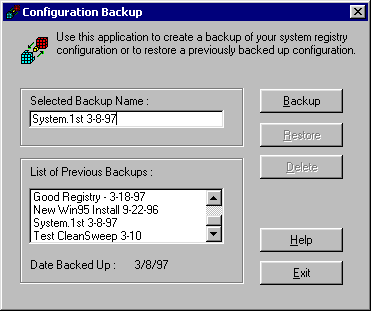
The Emergency Recovery Utility is one of the CD-Extras, so if you don't have the CD-ROM version of Windows 95, Click Here to download it now. Microsoft Configuration Backup UtilityThis "must-have" utility enables you to back up your system configuration information (the registry) and keep up to nine copies of your configuration at any time.
The Configuration Backup Utility is one of the CD-Extras, so if you don't have the CD-ROM version of Windows 95, Click Here to download it now. Using LogViewYour Windows 95 CD contains a utility called LOGVIEW.EXE in \OTHER\MISC\LOGVIEW, which lets you view and edit your SCANDISK, SETUPLOG, MODEMDET, NETLOG, DETLOG, BOOTLOG and NDISLOG files. These files can be helpful when you're troubleshooting some parts of your system. Just copy LOGVIEW.EXE to your \Windows folder and make a shortcut to it anywhere. If you don't have the CD-ROM version, Click Here to see more information about it and the other " s" or Click Here to go get it right now. Easy Disk Copy From the DesktopCreate a shortcut on the desktop with diskcopy a: a: at the command prompt to copy a disk (substitute b: to use b: drive). Opening the Media Player From an AVIWhen an AVI file is already playing, you can open Media Player by double-clicking the title bar of the AVI. Double-click the Media Player title bar to exit. Print your Configuration SummaryTo print a copy of your system configuration summary, double-click the Systems icon in Control Panel (or right-click My Computer and select Properties), and then click the Device Manager tab. Click Computer, and then Print. Creating Multiple Hardware ProfilesHardware Profiles are used to set up multiple hardware configurations. This is especially useful for laptops that have docking stations or workstations with removable storage media. The following example demonstrates how to set up hardware profiles for a laptop with a docking station that has this configuration:
[Open Systems Properties:]
[To Set Up the Video Driver for Docked and Undocked Configurations]
[To Set Up for No Network in an Undocked State]
[To set up for no RNA while docked]
Creating a Second Undocked ConfigurationTo create a second, undocked configuration for your portable (for example, one configuration has a printer and the other does not), follow these steps:
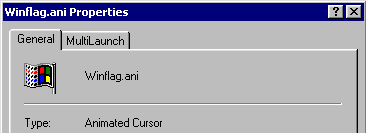
Preview your Animated CursorsWindows 95 comes with the ability to use animated cursors. A couple are installed by default; one example is WINFLAG.ANI. (you'll have many, many more if you installed the Plus! pack.) If you try to view these cursors in Explorer, all you'll see is a static (non-moving) image. Here's two ways to preview them in action. Right-click on the .ANI file and select Properties. Alternately, single-click the .ANI file and press <ALT> + <Enter>. The figure below is what you ought to see.
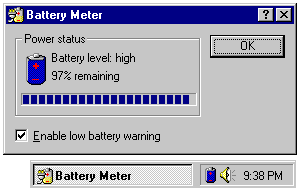
Viewing Remaining Battery Life on a LaptopFor computers with APM (Advanced Power Management) functionality, click the Battery icon on the taskbar to view a detailed battery meter.
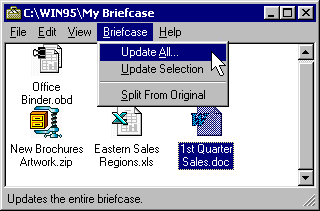
Automatic Synchronizing of Files on your LaptopIf you have files that you want to keep synchronized between your portable, your office desktop, and your home computer, you should create Briefcases on both your desktop computers, and then keep the files on your portable. Drag the documents from your portable to the Briefcase on each desktop computer. Then, each time you connect your portable to a docking station, the Briefcase on the desktop computer synchronizes the files.
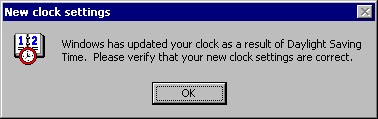
Assigning Sounds to EventsTo assign sounds to events, double-click the Sounds icon in Control Panel. There's also a "Preview" button so you can sample the sounds you choose. Once you have everything set up as you like, you can even save the entire sound set as a "Scheme" for retrieval later. Quick Return to the Start MenuPress CTRL+ESC to display the Start menu. On a Microsoft Natural Keyboard, press a Win key to display the Start menu. This is especially handy for those times when you are installing new applications that use those "Full Screen" setup programs that take up the entire screen and hide the Taskbar. Context HelpOn the upper right side of each dialog box is a question mark button (?). Click it and then click a control or item in the dialog box. A short description of the item appears. Using DriveSpaceYou can use DriveSpace to compress hard and floppy disks, which creates more free space on the disks. You can also use DriveSpace to configure disk drives that you have already compressed using DoubleSpace or DriveSpace. Using ScanDiskYou can use ScanDisk to check your hard drives for both logical and physical errors. ScanDisk will detect any errors, and then repair damaged areas. This is one of the most useful (and necessary) Disk Utilities included with Windows 95. We strongly recommend running ScanDisk at least once a week. Using Disk DefragmenterUse to speed up your hard disk by defragmenting the files on your hard drive. Fragmentation occurs as a result of your computer splitting files up into bits and pieces as it stores them onto the magnetic surface of your hard drive. You can use Disk Defragmenter to "rearrange" all of your built-up file fragments into complete file blocks, which will not only speed up file access but it will also slow down the wear and tear on your hard drive heads since they won't have to jump around all over the disk surface reassembling a fragmented file each time you access it. This is one of the most useful (and necessary) Disk Utilities included with Windows 95. We strongly recommend running Disk Defragmenter at least once a week. Automatic changes for Daylight Saving TimeWhen you first turn on your PC the morning after DST took effect, you may have been greeted with with this "New Clock Settings" dialog.
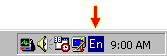
If you weren't, the first thing you may have to do today is change you PC's clock since Daylight Savings Time took effect last night. If you'd like to automate this twice-a-year chore, here's how. Open Control Panel, open Date/Time then click the Time Zone tab. Check the box labeled "Automatically adjust clock for daylight saving changes". Just be advised that this feature will NOT be available with any versions of Windows 95 later than the original release (950). For example, if you just bought a new PC with the OEM2 version, you'll find that this feature has been discontinued. To be sure, right-click My Computer and select Properties. On the first screen it should say "System: Microsoft Windows 95 - 4.00.950". This is the original release. If it says "4.00.950B, you won't be able to use this DST trick. Languages and Keyboard LayoutsTo change keyboard layouts while you work, make these changes:
 Return to Top of Page Return to Top of Page
To Main Page |
Start Me Up! Best experienced with All other product names are trademarks or registered trademarks of their respective owners. |
 In this Issue: