|
Before you proceed, and definitely before you even THINK about attempting any of the Registry Hacks you're about to learn about, please take the time to read the first two sections on this page, Introduction and Disclaimer! I really, REALLY mean it!
Introduction IntroductionBack in the old days (before Windows 95, that is), many 16-bit Windows applications used to clog the \Windows and \Windows\System directories with garbage, throwing files everywhere and making uninstallation a real pain in the ASCII. Among the files flung about were initialization (.INI) files that contained data paths, user and program settings, and other items. Nowadays, many people are trying to stick mostly with 32-bit applications in order to get the most out of Windows 95. However, if you still run 16-bit applications (and who doesn't?), you're still going to have applications scattering files all over your hard drive, but at least you can finally say good-bye to all those pesky .INI files. Now we have a new monster to tame: the Registry. The Registry has all of your vital system information in one place, and, if the number of .INI files you used to have is any indication, this place is going to be a navigational nightmare! The Registry is made up of two files, SYSTEM.DAT and USER.DAT--both tucked away in your \Windows folder. These files are so critical to Windows 95 that they're backed up every single time you boot in Windows 95. (The backups are named SYSTEM.DA0 and USER.DA0.) Also, you should find a file named SYSTEM.1ST located in the root of C:\. This is a copy of your first-ever, successfully booted Windows 95 Registry, created after the initial install. I've found this file to be a real lifesaver on more than one occasion. Should disaster strike, you're never more than a File Replace away from that point in time. You may have to reinstall whatever applications you installed after installing Windows 95, but at least you've got a clean slate to start from again. Before we go any farther, let's get one thing straight: Registry hacking is not recommended for beginning enthusiasts or the faint of heart. The Registry is a dark, unforgiving place that will eat you alive if you don't know exactly what you are doing. Only knowledgeable PC operators should even think of attempting any of the following hacks. Improper changes in the Registry may, no, let's be absolutely clear, -WILL- cause problems! DISCLAIMER: I don't take any responsibility whatsoever for any damage to your system should you decide to proceed.NOTE: For some of these setting changes to take effect, it will be necessary to reboot your system. Windows 95 Configuration Backup UtilityBefore you try any of these tips, I strongly recommend you get a copy of the Windows 95 Configuration Backup utility, this will make up to nine separate backups of various configurations, including all Registry information. If you bought Windows 95 on CD-ROM, you already have it. It's located under Other\Misc\Cfgback. Copy CFGBACK.EXE to your \Windows folder and CFGBACK.HLP to your \Windows\Help folder. Make a shortcut to CFGBACK.EXE file in your System Tools folder. That's all there is to it. It's too easy NOT to do it! If you don't have the CD-ROM, you can still get the Configuration Backup Utility (and anything else that the CD-ROM has that the disk sets don't) from the following places:
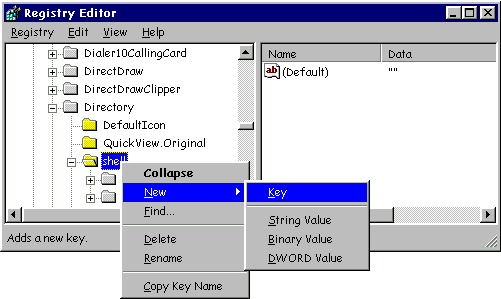
CLICK HERE to see a screen shot of the Configuration Backup Utility. Where is it?The Registry Editor is probably one of the most useful tools for customizing Windows 95. The only problem is that Windows doesn't put it where you can find it easily during Setup. Open the \Windows folder and locate the file REGEDIT.EXE. Drag it to your Desktop or, better yet, to the System Tools folder to create a shortcut. Name the shortcut "Registry Editor." The Registry Editor is a powerful tool, therefore, it is also dangerous. Unlike other Windows 95 "uh-oh's" that can be corrected by a reinstall, that won't always work here. If you reinstall, your Registry may return in its last form with many of your now incorrect entries. Only system-related entries can be restored this way, which is handy for saving all your customization and setup information, but not so handy if it's been corrupted. Clearing items from the Saved RUN ListboxRun the Registry Editor (REGEDIT), and from the menu bar, select Edit|Find. Enter RunMRU in the Find What dialog box, then click Find Next. The first stop will be a location buried down about eight levels, called: My Computer \HKEY_CURRENT_USERS \Software \Microsoft \Windows \CurrentVersion \Explorer \RunMRU.What you should see is RunMRU highlighted in the left pane and its exploded view in the right. There are three key entries here. The first, under Name and Data, is (Default) and (value not set). Never, under any circumstances, delete this entry. Next are the actual entries themselves, all listed by letters of the alphabet under Name. These entries you can eliminate by highlighting the letter entry, then hitting the Delete key. The third entry type is called MRUList and contains all the "used" letters designated by other entries. You can highlight it, double-click it, and delete only the letters of items that you've deleted to keep the listing accurate. Open new windows when you want them toWindows Explorer seems to give you only two choices when it comes to how your folders open in succession--either the new one replaces the old or they all open and stay open. You have other choices, though. When browsing folders, most people have Windows set to a single-window browse mode that changes when you open a new folder (instead of opening a new window for each folder). But if you want to copy or move files around, it's nice to be able to quickly open a separate window for a folder. To see if you are using single-window browse, open My Computer and select View|Options. Instead of clicking the radio button labeled "Browse folders using a separate window..." you can add an Open New Window option to the Right-Click menu. Here's how: Run REGEDIT and scroll down to HKEY_CLASSES_ROOT\Directory\Shell. Right-click the shell folder and select New|Key from the resulting drop-down menus, as shown below.
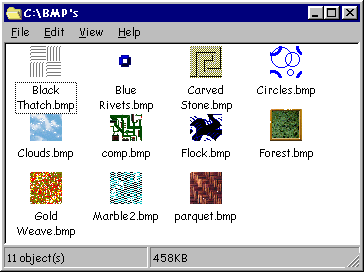
A new Key box will appear with the words New Key #1 in it. Rename this new key to OpenNew. Double-click the (Default) value in the right pane and change its Value data to Open New &Window then click OK. Add another key under OpenNew called Command. Set the (Default) value for this key to explorer %1. Now whenever you right-click any folder, you'll be able to select "Open a New Window" from the drop-down menu or by hitting W. [That's why you had to enter the ampersand (&) before Windows above; this is what gives it a speed key.] Display .BMP files as iconsWant to make sorting and viewing .BMP files a snap in Explorer views? For this you need to identify which File Type or Description is used for your .BMP files. Open \HKEY_CLASSES_ROOT and scroll down until you come to .BMP. Highlight it and look in the right pane under Data to determine what File Type you're looking for. The Default is generally Paint.Picture, but if you've installed any new graphics applications or viewers lately, this may have changed. Assuming that it is still Paint.Picture, go down through the same tree until you come to \HKEY_CLASSES_ROOT\Paint.Picture\DefaultIcon. Highlight DefaultIcon, then double-click the (Default) entry in the right pane. Modify the Value data value to %1 and click OK. (You may want to make a note of the original value in case you ever need or want to restore it.) Now every .BMP file will display itself as its own icon, as shown below.
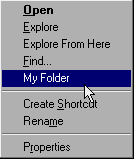
The "%1" tells Windows that the default icon for this file type is in the file itself, and since there is no icon in a .BMP file, Windows 95 makes a small preview image of the .BMP for the icon. You can also rename any .BMP file to .ICO, then use it as an icon for other applications. Windows 95 will resize the file to icon size and change it to 16-color. How well it actually appears on screen depends on many factors, such as its original size, complexity, and depth of color. In other words, some .BMPs will convert better than others. Speed up your Start menuYou've already created new Keys in the Registry; now we're going to create a new String Value. To do this, right-click on the item in the left pane that you want to add this new attribute to and select New|String Value; the item's new data field will appear in the right pane. Create a new String Value under HKEY_CURRENT_USER\Control Panel\Desktop and name it MenuShowDelay. Set its value as a number from 1 to 10 for blazingly fast menu drop-downs, 1 being the fastest. (The default, by the way, is 250.) This sets the amount of delay time in milliseconds that it takes from when you click the Start button before the various menus start to pop up. To really see if it's working, set this attribute to 10000 and see what happens. Lose that ugly Recycle Bin iconRun REGEDIT and from the menu bar choose Edit|Find, enter Recycle Bin in the Find What box, then click Find Next. The Recycle Bin should show up in the right pane. Right-click on a blank spot in the left pane to reveal which Key contains the Recycle Bin information; it will be a long alphanumeric string. Once found, click the little [+] next to it to show the subkey named "DefaultIcon." Double-click Default Icon to show the icon path information in the right pane. Double-click the Name data of your choice, and edit it as you normally would. Remember, icon library files (such as C:\Windows\System\Shell32.dll) start counting at zero, so if you want to use just a single .ICO file, enter its path followed by a comma and a zero, as in C:\Windows\Trashcan.ico,0. Changing the icon for My Computer works exactly the same way. Run a Find for My Computer (or whatever you've renamed it) and follow the procedure outlined above. Tired of digging through the Start Menu?You can set up your own pop-up menu item that will appear when you right-click My Computer, and here's how:
This particular example will open the root of Drive C. If you add /e to the end of the line, you'll explore it rather than open it. Note: if you choose a personal folder than contains a long file name, you'll need to enclose the long file name in quotations. The screen capture below shows the item added to your menu.
Use Quick View with any fileA handy tool that comes with Windows95 is the Quick View application. By right-clicking on some files, you'll see an option called Quick View, that will allow you to view the contents of a file without opening the application. The problem is that this doesn't work with just any file. To get your favorite files to work with the Quick Viewer, follow these steps:
Print out a Directory ListingAlthough there is no built-in way to print a directory listing (all the filenames in a folder), there is a way to add this functionality to Windows95. Here's how you do it:
CD %1 Note: this assumes that your printer is connected to the LPT1 port, which is true for most users. However, if your printer is connected over a network or you have more than one printer, you need to change LPT1 to the correct port. Compacting the RegistryAs you may have noticed, your Registry can become quite large. This is due to the nature of databases; in an effort to improve performance (how fast Windows95 can read and write to the Registry), deleted items aren't necessarilly removed from the Registry files. This means that after some time, your Registry can become bloated with empty space. Compacting a database rewrites the entire file with only the information that is being used - unwanted or unneeded entries are not removed, however. This results in a smaller file (good if you're low on disk space), and a quicker bootup. Here's how to compact the Registry:
Important: if you receive an error at this point (such as "CAN'T ACCESS REGISTRY"), see below. That's it. You should now be able to restart Windows95, and you'll notice your Registry is now substantially SMALLER and FASTER.
If you receive an error: In all fairness to this 'hack', I've run it myself without incident several times. Others, however weren't so lucky. Some have reported problems when trying this trick but I've never heard of anyone experiencing any catastrophic loss of data because of it. Just use common sense (read: don't skip step #1), follow the instructions and everything should perform as expected. If you have a problem, a simple restoration will put you back to at least where you were before you started. Changing Windows RegistrationDid your PC come with Windows 95 preinstalled? Doesn't it bother you to see that you're registered as "OEMUser" or some other impersonal name? Or do you regret that when you installed Windows, you registered under your real name and now want it removed? Either way, this can be changed. Here's how:
Continuous RefreshMaybe Windows 95 doesn't refresh your view of files and folders as often as you might like. Here's how to make it refresh constantly. Launch the Registry Editor, go to HKEY_LOCAL_MACHINE/System/CurrentControlSet. Select Control, then Update. In the right pane, right-click on UpdateMode and select Modify. Select the 01 and change it to 00. Click on OK, exit the Registry Editor and restart. Finding hidden CD KeysYour Windows 95 installation is corrupt and you need to reinstall, but you can't find that CD case it came in. What now? You can't reinstall without that CD-Key number that was on the case. Same thing goes for most Microsoft products on CD; Office, Publisher, the Plus pack, etc. Well, actually, it isn't gone. Your previous installation of the software recorded the CD-Key code into the Registry. Here's where to find it:
 Return to Top of Page Return to Top of Page
To Main Page |
Start Me Up! Best experienced with All other product names are trademarks or registered trademarks of their respective owners. |
 In this Issue:
 The Microsoft Network: Go to Windows 95\ Free Software\ Windows 95 CDROM Extras\ Other\ Misc.
Look for CFGBK.EXE


